SEARCH
Your address will show here +12 34 56 78

We often get questions from people who are having a hard time getting their turntable to hit a position, so we want to go over the quickest way of positioning a turntable and maybe clear up some of the confusion.

Every machine has an encoder that sends information to Spikemark as counts. In Spikemark, the user can choose to cue that piece of scenery using those counts, or translate them into inches, feet or degrees using a position scale. Inches and feet are great for linear movement, but for a turntable, the best way to represent the encoder counts is by having Spikemark translate them into degrees. Let’s look at how we do that.

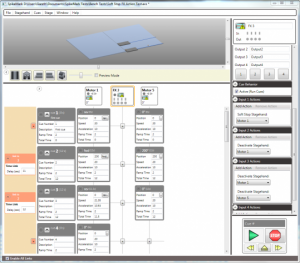
Once you’ve connected the turntable machine to Spikemark, take a look at the Positioning Window in the Motor Editing Pane. Make sure that the Position Units is ‘counts’, Position Scale is set to ‘1’, and then reset the Position to ‘0’.

STOTM-turntable positioning_1

On the turntable, make a physical mark that lines up with a fixed mark on the stage. Then, using the manual control, move the turntable four complete turns until the mark once again lines up with the fixed mark. Note: You can rotate any number of complete turns- the more turns, the more accurate your result.

Next look at the motor in the cue grid and you will see a big number followed by ‘cts’.

STOTM-turntable positioning_2

That’s the number of counts that the encoder sent to Spikemark during four full revolutions of your turntable. Now  we need to determine a position scale with a little math. Let’s say you moved 2,983,996.8 counts in 1440 degrees (360 degrees * 4 turns). 2,983,996.8 / 1440 = 2072.22. That’s your position scale. Go back to the Position Window of the Motor Editing Pane, enter your position scale and change the Units to ‘Degrees’.

Now you’re done. If you want to move the turntable one full revolution, just set the target to 360 degrees more (or less) than where it currently is. Half a revolution is 180 degrees, 720 degrees will revolve the turntable twice, etc…

That’s it for the December Spikemark Tip of the Month. If you have an idea for something that you think could use a little explaining just leave us a comment or send me an email at ian@creativeconners.com.

0

A common question we get here at Creative Conners is how to build a multi-step cue. We will look at two possible scenarios and explain how to achieve the effect using Spikemark. The first scenario: A turntable rotates slowly at one speed and then at a certain point,  without stopping, the speed changes and the turntable continues at the new speed until the cue ends. This is actually pretty simple to pull off. The trick is to write two cues that overlap, and when the second cue starts, it will smoothly take control of the turntable. Let’s take it step by step. Cue #1 rotates the turntable at 1 revolution per minute with a target of 720 degrees. The second cue rotates the turntable at 2 revolutions per minute and also has a target of 720 degrees. Cue #2 is linked to Cue #1 with a position trigger, so that when the turntable hits 360 degrees Cue #2 will start. When cue #1 runs, as soon as the turntable hits 360 degrees cue #2 takes over, speeds up the revolve, and completes the cue. Cue #1 never completes since it is superseded by cue #2, but that’s OK, Spikemark simply moves on to the next cue. Our second scenario: A wagon tracks upstage towards a wall and when it gets near the wall, the wall bi-parts, allowing the wagon to travel through. The problem with this scenario is that you don’t want the wagon to crash into the wall panels, and you don’t want the walls to open until absolutely necessary so that the movement looks slick. The solution here is three cues. Cue #1 has a target that stops the wagon before it gets to the wall (in case the wall does not open). Cue #2  opens the wall, and can be driven with a position link to of cue #1. Cue #3 moves the wagon through the wall and can be triggered with a position link that references the wall opening once the gap is wide enough for the wagon to get through. The trick is that cue #3 is triggered from cue #2 before cue #1 finishes, so it looks like the wagon has one fluid motion towards it’s upstage target.  If something goes wrong, and the walls don’t open, the trigger point for cue #3 is never reached and cue #1 stops the wagon short of a collision.  Pretty neat, right? By the way, multi-speed cueing is explained in the Spikemark manual on Page 103. That chapter has a lot of info about complex cue creation and I urge everyone to check it out.
0

Creative Conners Business

We love our deck sheaves, and we hear that lots of other people love them too. They’re quiet, thin and designed specifically for theatrical applications. Playwrights Horizons liked theirs so much they asked us to build some spot blocks with the same features. So we designed and fabricated (and even painted!) four new models of pulleys and we were so happy with the result that we are adding them to the product line. Now that Royal has joined the shop as Product Engineer, we have streamlined the design for mass production and we are working with Clark-Reder Engineering to obtain an official load-rating.  We will start selling the new Spot Block models in October.

Our new Spot Block product line uses a 2” Mega-Coupler for attachment to 1.5” pipe or 2” truss tube. We are making both singles- and double-sheave versions with either 3.5” or 5” diameter sheaves. The cost for the 3.5” size will be $235 for the single sheave and $390 for the double. The 5” diameter blocks will cost $265 for the single and $450 for the double.

The shop, the staff, and the product line are all expanding at CCI. We have more new products in the pipeline and we’ll share a sneak peek as soon as we can.

0

Creative Conners Business

One of my New Year’s resolutions is to do a better job marketing our products. Five and a half years ago I was much more aggressive about sending out brochures and postcards regularly. Of course, back then we weren’t really making any sales so I had plenty of time on my hands to focus  on marketing.

Those efforts slowed to a trickle as production demands grew. Last year we sent out a  single mailing in January and then nothing else.  I think it’s dangerous to get complacent about growing our customer base.

As an experiment, we are going  to send out a direct mailing once a month for the entire year  and track the resulting interest and sales to determine how much our marketing efforts are worth. To liven up the experience, we’re rolling out 3  promotions during the course of  the year that will  be announced on postcards and  on  our site. So get ready, it’s going to be a fun year!

0

Automation, Programming

Just a quick post to point out a cool new feature in SpikeMark — Input Actions.

Before Christmas, one of our customers had a specific need. They do a lot of performer flying systems and build incredibly complex cue link sequences to achieve realistic flying effects. Sometimes a winch needs to be temporarily removed from the show for a cue or two. If a performer misses a pickup, the motor needs to be disabled and the automation tech will drive the winch manually to get the actor back on spike. They have built their own hardware to make it easy to switch between automated control and joystick control, but SpikeMark wasn’t playing nice.

In an automated cue link sequence, SpikeMark wants to see every motor involved in the cue load the cue information before executing. This is obviously done for safety, if the cue isn’t fully loaded SpikeMark doesn’t want to crash scenery. In the performer flying scenario, the operator KNOWS that it’s OK to run the cue sequence, in fact disrupting the link sequence causes a lot of trouble. What was needed was a button that could be pressed to temporarily deactivate a motor and let the rest of the show carry on as if it didn’t exist. So… what to do…

Just after Christmas, another customer had a  show with a triple ring turntable. Each ring would be running in a cue and at an actor-driven moment in the  show, the middle ring needs to decelerate and stop. If you tried to use “Stop All Cues”, all 3 rings would stop. The stop point is actor driven, so there’s no way to write an automated link. What was needed was a button that could be pressed to abort a single motor out of a cue sequence.
So.. what to do…


A new feature called Input Actions

If you have a  Stagehand FX, you can now use the inputs to trigger global actions. The first two actions that have been created are:

  • Deactivate Stagehand

    This action will take a motor out of all cues until the input is released without affecting cue links.

  • Soft Stop Stagehand

    This action will abort a Stagehand by taking the programmed deceleration rate immediately without effecting other motors running in a cue.


Input  Actions can be added to any FX input and multiple actions can be attached to a single input, making some cool effects possible. Below is a screenshot:


Input Actions — New SpikeMark Features

If you have ideas for more Input Actions, let us know because I’d love to make this feature even more useful.

0